Observations
About
All the details that an inspector observes during the inspection itself are captured in the list of observations. A single observation corresponds to a single feature or problem that was noticed during the inspection of the sewer or water way. Possibly together with some extra data to better describe the observation.
CAM-I uses the official european standard EN 13508-2:2003+A1:2011 as the letter coding to identify the observation, but this is only a configuration file, technically, any lettering system can be used, if desired.
Add new observations
By default, observations can only be added during recording and only after all the required fields for the strand have been filled in, but these features can be turned on/off in the General settings on the configuration page.
You can add a new observation in one of the following ways:
- clicking on the 'eye' icon at the bottom of the observations list. This will add a new observation and the code editor box becomes active so that you can immediately start entering the code on the keyboard.
- pressing the space bar during recording will also add a new observation and automatically open the code-tree-selector popup (see entering the code)
- pressing ctrl+ space bar during recording will add an observation without showing the code-tree-selector. Instead, the code editor box becomes active.
The observation will be added at the current video position and distance of the tractor. So if you are adding observations after recording, use one of the following techniques to select the insert position:
- the video position slider to select the position within the video. This will also automatically select the distance of the tractor
- the inclination / track view to select the tractor position, which in turn will also update the position within the video.
The application will also automatically add observation records at the appropriate time, such as at the start and end of the recording.
Entering the code
You can enter the observation code with the keyboard or select it with the mouse, either which way you prefer to work, you can always use the context sensitive drop down list or code-tree-selector popup to help you navigate through all the valid options.
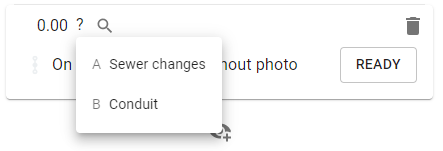
If you click on the question mark or press 'enter', the dropdown list will show. To select a value from the list, click on it or press the corresponding letter(s) at the front of the menu item.
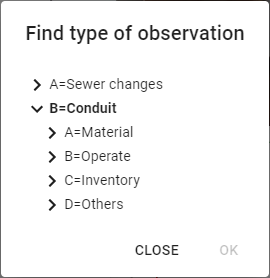
The code-tree-selector popup will open when you click on the magnification glass or when you press F3. You can select the code sequence by clicking on the tree items or by entering the corresponding letter(s). Notice that the underlying text box will also show your current selection.
If you have made a mistake while entering the code sequence, you can always remove the last letters with the backspace. This also works when the code-tree-selector popup is open. In that case you can also simply click on another tree structure and the code sequence will update accordingly.
If you don't correct a mistake that you entered with the keyboard and you end up with an invalid code sequence, the part that is incorrect will be shown in red and you wont be able to proceed with the rest of the sequence or any other details. By default, you also wont be able anymore to add any new observations for as long as the current has not been filled in completely, although you can also control this feature from the settings page, on the 'General' tab.
More details
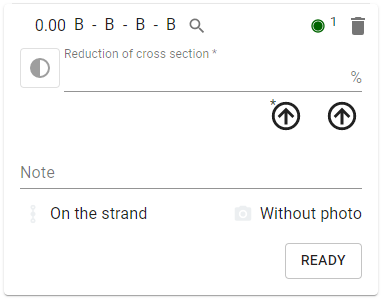
Once the code has been entered completely, the application will show the rest of the parameters that are required for the currently selected code. This can be:
- 1 or 2 measurements or text values.
- 1 or 2 direction indicators, used to indicate at which clock position the observation was done
- an extra notation
- a toggle button to select if the observation was on a strand or joint. Often, the application can determine this itself based on the selected code sequence.
- a toggle button to select if a photo/sonar/lidar needs to be included in the report for this observation
When a value is required, this is indicated with an asterix (*) after the field title. If something is filled in wrong, like a text value instead of a number of a value that is out of range, than the field will be displayed in red after you have pressed on the 'ready' button.
delete an observation
To delete an observation, first expand it by clicking on the observation you want to remove. Once expanded, there will be a garbage can in the upper right corner. Use this to delete the observation. Note: before actually removing the observation, a dialog box will ask you to confirm the action.
move observations
It is possible to move the position of an observation, either the video position or the tractor distance or both at the same time.
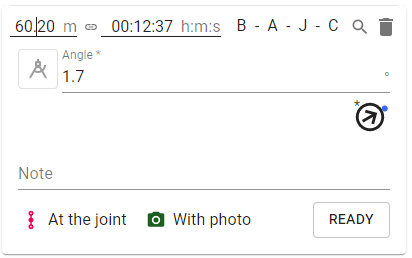
An observation shows the tractor distance in the left-upper corner. If you click on this value, the edit field will expand so that the tractor distance is also visible.
Between both values is a toggle button that allows you to select if the values are:
- linked together. In this case, if you change 1 value, the other value will be updated automatically, based on the recorded data of the tractor so that both values remain in sync.
- not linked. This allows you to enter any distance or video time value and is primarily useful if you have imported the video or have used a tractor that doesn't report the correct distance values.
about continuous observations
Some observations have a start and end point. CAM-I calls these continuous. They can be recognized by the presence of a led sign in the upper-right corner together with a number. When a continuous observation is complete, there are 2 entries in the observations list, both with the same number. The following table shows the meaning of the different states that the led can be in:
 | When you first create a continuous observation, the led will be green to indicate that it's still active |
 | When the continuous observation is closed, both start and end observations will have an empty/off led |
 | When something is wrong, usually because there is a terminator observation without a corresponding start point or multiple , the led will turn red. |
multiple continuous observations
It is possible to have multiple continuous observations of the same type, opened at the same time. When the system detects that you have entered the same code sequence as for an already running continuous observation, it will ask for your intentions:
- change some values for the currently running one
- start a secondary continuous observation of the same type
closing a continuous observation
You can close a continuous observation by entering the same code as the starting point, but where the last letter is replaced with '1'. This observation can also be generated automatically by clicking on the green led. This will open a popup menu to ask for your intentions:
- close the current observation
- or change the current observation (which requires closing the previous one and opening a new one).
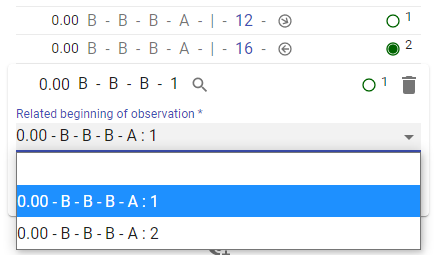
The system will present a dropdown menu with all the possible observations that can be closed when there are multiple possible starting points for a closure. The labels in the drop-down list contain the following values:
- the distance at which the observation started
- the letter code of the observation
- the sequence number of the continuous observation (as found in the upper right corner)