strands and manholes
structure
Each project contains 1 or more strand inspections where each inspection contains:
- information about the strand or manhole itself, like:
- references and or coordinates to the related nodes
- a reference or Id (auto generated for you)
- more info about the location like the name of the street and/or area, the type of location and who owns the land
- the inspection method,
- the direction of the inspection
- when the inspection took place
- the weather conditions during the inspection
- when the strand/manhole was built
- the material used in the strand/manhole
- the shape and size of the strand/manhole
- the type of system and what it is used for
- serial numbers of the devices that were used
- general comment
- a list of observations that were made during the inspection.
- a video recording
- optionally a recording of:
- the data produced by the crawler
- all the sonar images
- the lidar data
Working with strands
Strands and manholes are represented in the project by tabs. Each tab is a unique strand or manhole together with it's video and crawler data.
The last tab in the list is a '+' sign. Use this icon to add new tabs. The interface will automatically switch to the newly added tab. By default, when you add a new tab, all the field values of the previous strand (except for the observations list) will be copied into the new one. This is useful when you are inspecting an entire street so that you don't always have to fill in the same data. You can control this behavior from the the settings page, on the first tab (general).
On the far right side of the tabs list is a garbage can icon. This will remove the currently selected tab from the project, including video and crawler data. When you remove the last tab, the system will automatically add a new empty tab so that the project isn't empty.
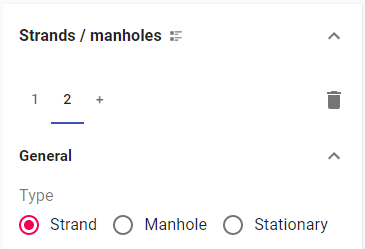
The inspection type
The first line in the general section of the tab allows you to specify the type of inspection that you want to do. Currently the following inspection types are supported:
- strand: use this for regular inspections of strands with a crawler that drives into the strand
- manhole: use this for inspections of a manhole using a camera that gets lowered into the manhole.
- stationary: this is a special case of the strand inspection where no crawler is used to drive into the strand, but instead, a stationary zoom camera is lowered into the strand and a zoom function is used to look deep into the strand.
By default, when you create a new tab, the previously selected type will be used for the new inspection. Just select the corresponding radio button for changing the type of inspection.
danger
Each inspection type has it's own set of allowed observations. So, when you change the type of the inspection, all previously added observations for that inspection will be removed since they are no longer valid for the new inspection type.
overview
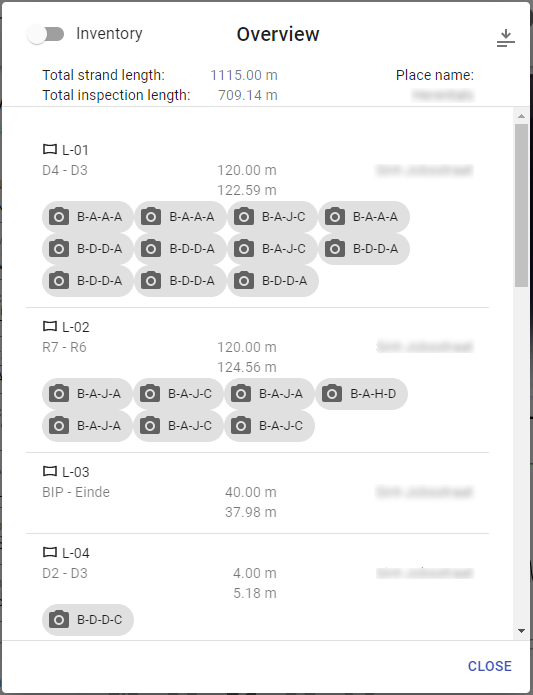
Once you have a couple of inspections in your project, the tabs by themselves aren't extremely convenient for finding a specific inspection. To make navigation between inspections easier, there is a strands overview that you can access from the icon after the 'Strands/manholes title' above the list of tabs (see screenshot above).
This overview displays a list of all the inspections in the project. When the icon is horizontal, the inspection is a strand, when vertical, it was a manhole. The overview also contains the id, start & end nodes, expected and actual inspection lengths, city and street names and a list of the codes that were entered for each inspection. you can choose between inventory or problem codes.
When you click on an item in the list, the overview will be closed and the corresponding tab will be opened. This way, you can quickly navigate to wherever you want to go or find relevant info without having to search the entire project.
Live camera vs video
Whenever you switch tabs, all the crawler data and video(s) will be reloaded for that tab. If there is no recording yet done for that tab, the system will automatically switch to live camera mode. However, if there is already a video available for the selected strand, wether the video section will go to live camera or video view, depends on the selection done in the video-section.
At the top of the video section is a floating toolbar. The first 2 icons allow you to select which is the currently active view. The background of the toggle buttons indicates the currently selected mode. The blue icon however identifies what is really being displayed at the moment. The following table shows you the different possible combinations and their meanings:
 | Video is selected (gray background) and it is also currently loaded (blue icon) |
 | The camera is selected (gray background) and active (blue icon) |
 | Video is selected (gray background) but there is no video yet, so the camera is still active (blue icon) Note: once the video has been recorded in this mode, the display will immediately switch to the video. |
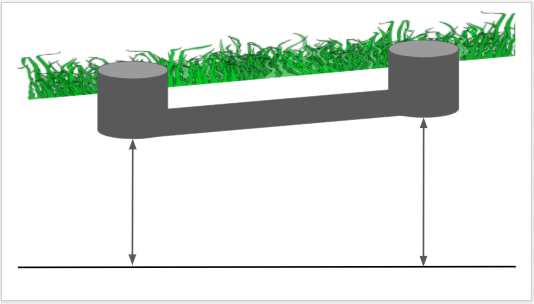
relative start & end knot depths
In the strand details are 2 fields 'Depth at initial knot relative' and 'Depth at end knot relative' which play a very important role in the generation of the inclination report for the strand. These values determine how high the start & end point are compared to a base line. They are normally pre-determined and can be found on the architectural plans of the sewer system. As these values don't express how deep a knot is, but how high it is compared to a line below the knot, things might seem counter intuitive at first. Hopefully, this drawing might clear things up.